本頁內容
貢獻 React Router
感謝您的貢獻,您真棒!
關於開源,有許多不同種類的貢獻可以做出,所有這些都很有價值。以下是一些指南,應有助於您準備您的貢獻。
設定
在您可以貢獻程式碼庫之前,您需要 fork 儲存庫。這看起來會有點不同,取決於您要進行哪種貢獻
- 所有新功能、錯誤修復或任何會修改
react-router程式碼 的內容都應該從dev分支分支出來並合併到其中 - 僅修改文件的變更可以從
main分支分支出來並合併到其中
以下步驟將協助您設定好以貢獻變更到此儲存庫
- Fork 儲存庫(點擊Fork按鈕,位於此頁面的右上角)
- 在本地端 Clone 您的 Fork
# in a terminal, cd to parent directory where you want your clone to be, then
git clone https://github.com/<your_github_username>/react-router.git
cd react-router

# if you are making *any* code changes, make sure to checkout the dev branch
git checkout dev
- 安裝依賴項並建置。React Router 使用 pnpm,所以您也應該使用。如果您使用
npm安裝,將會產生不必要的package-lock.json檔案。
認為您發現錯誤?
請符合 issue 範本,並提供可重現的路徑以及程式碼範例。最好是包含失敗測試的 Pull Request。其次是連結到 CodeSandbox 或儲存庫,以說明錯誤。
新增範例?
範例可以直接新增到 main 分支。從您本地 clone 的 main 分支建立一個分支。完成後,建立一個 Pull Request 並概述您的範例。
提議新的或變更的 API?
請提供周全的評論和一些範例程式碼,展示您想在您的應用程式中使用 React Router 做什麼。如果您可以先向我們展示您如何受到目前 API 的限制,再跳到關於需要變更和/或新增什麼的結論,這將有助於對話。
我們從經驗中得知,小型 API 通常更好,因此我們可能會有點不願意新增新的東西,除非目前 API 存在明顯的限制。話雖如此,我們總是渴望聽到我們以前沒有考慮過的情況,所以請不要害羞!:)
問題未獲得關注?
如果您需要修復錯誤,但沒有人修復它,您最好的辦法是為其提供修復程式碼並建立Pull Request。開源程式碼屬於我們所有人,而推動它前進是我們所有人的責任。
建立 Pull Request?
Pull Request 只需要兩個或更多協作者的批准即可合併;當 PR 作者是協作者時,這算作一個批准。
dev 分支。您可以在 GitHub 中撰寫 PR 時設定 base,透過「Compare changes」標題下方的下拉選單: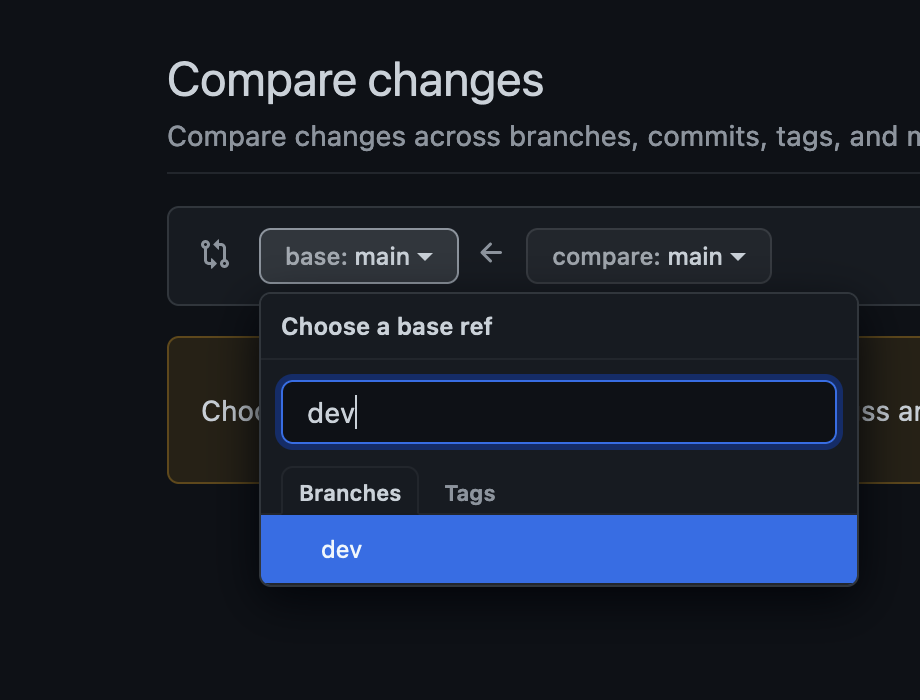
測試
所有修復錯誤或新增功能的提交都需要測試。
<blink>沒有測試請勿合併程式碼!</blink>
文件 + 範例
所有變更或新增 API 的提交都必須在 Pull Request 中完成,該 Pull Request 也會更新所有相關範例和文件。
文件位於 docs 目錄中。一旦變更進入 main 分支,它們將自動發布到文件網站。
如果您想預覽變更在文件網站上的外觀,請 clone react-router-website 儲存庫,並按照 README.md 中的指示在本地檢視您的變更。
開發
套件
React Router 使用 monorepo 來託管多個套件的程式碼。這些套件位於 packages 目錄中。
我們使用 pnpm workspaces 來管理依賴項的安裝和執行各種腳本。若要安裝所有內容,請確保您已安裝 pnpm,然後從儲存庫根目錄執行 pnpm install。
建置
從根目錄呼叫 pnpm build 將執行建置,這應該只需要幾秒鐘。一起建置所有套件非常重要,因為個別套件彼此之間存在依賴關係。
測試
在執行測試之前,您需要先執行建置。建置完成後,從根目錄執行 pnpm test 將執行每個套件的測試。如果您想為特定套件執行測試,請使用 pnpm test --projects packages/<package-name>
# Test all packages
pnpm test

# Test only react-router-dom
pnpm test --projects packages/react-router-dom
儲存庫分支
此儲存庫為不同目的維護不同的分支。它們看起來會像這樣
- main   > the most recent release and current docs
- dev    > code under active development between stable releases
- v5     > the most recent code for a specific major release
可能還有其他分支用於各種功能和實驗,但所有的魔法都來自這些分支。
新版本發布
當需要發布新版本時,我們會根據我們的分支策略,依照發布類型遵循一個流程。
react-router@next 版本發布
我們從 dev 分支的目前狀態建立實驗性版本。它們可以使用 @next 標籤安裝
pnpm add react-router-dom@next
# or
npm install react-router-dom@next
當 PR 合併到 dev 分支時,這些版本發布將會自動化。
最新主要版本發布
# Start from the dev branch.
git checkout dev

# Merge the main branch into dev to ensure that any hotfixes and
# docs updates are available in the release.
git merge main

# Create a new release branch from dev.
git checkout -b release/v6.1.0

# Create a new tag and update version references throughout the
# codebase.
pnpm run version [nextVersion]

# Push the release branch along with the new release tag.
git push origin release/v6.1.0 --follow-tags

# Wait for GitHub actions to run all tests. If the tests pass, the
# release is ready to go! Merge the release branch into main and dev.
git checkout main
git merge release/v6.1.0
git checkout dev
git merge release/v6.1.0

# The release branch can now be deleted.
git branch -D release/v6.1.0
git push origin --delete release/v6.1.0

# Now go to GitHub and create the release from the new tag. Let
# GitHub Actions take care of the rest!
Hot-fix 版本發布
有時我們有一個關鍵錯誤需要立即修補。如果該錯誤影響最新版本,我們可以從 main(或錯誤存在的相關主要版本分支)直接建立新版本
# From the main branch, make sure to run the build and all tests
# before creating a new release.
pnpm install && pnpm build && pnpm test

# Assuming the tests pass, create the release tag and update
# version references throughout the codebase.
pnpm run version [nextVersion]

# Push changes along with the new release tag.
git push origin main --follow-tags

# In GitHub, create the release from the new tag and it will be
# published via GitHub actions

# When the hot-fix is done, merge the changes into dev and clean
# up conflicts as needed.
git checkout dev
git merge main
git push origin dev